

Email Protection Plus
Contents
- Service Requirements
- Service Management for Admins
- Service Management for Individual Users
- Troubleshooting
Service Overview
Execulink’s Email Protection Plus has the following key features:
- Provides email security (anti-virus, anti-spam) for domains hosted on end user mail servers.
- Permits the service to be enabled/disabled on a per user (email address) level.
- Queues inbound messages for up to 4 days, offering some redundancy in the event of an outage to an end user mail server.
- Allows clients to self-manage their service via MyExeculink at both an administrative and an individual user level.
Service Requirements
In order for the Email Protection Plus service to function properly, the following elements are all required:
1. The service must initially be provisioned by Execulink for the specific domain.
- Part of this provisioning process requires you to provide us with the IP address and/or hostname of the mail server which is hosting your domain’s email.
2. All email addresses for a protected domain must be provisioned on both the end user mail server and on Execulink’s system as well, whether protection is required for a specific address or not.
- Any email addresses not defined on Execulink’s system will not receive ANY external email.
- (Users are only billed for those email addresses which have the Email Protection Plus service enabled.)
3. End user routers/firewalls must be configured to allow incoming SMTP (TCP port 25) traffic from the following IP address range:
- 69.63.44.0 – 69.63.44.255 (69.63.44.0/24).
4. The MX record for the domain must be pointed to mailrouter1.execulink.com.
Service Management for Admins
This section refers to the administrative functions that are available which allow a designated individual to manage the Email Protection Plus service for an entire company. Administrators have the ability to:
- Add/remove addresses
- Enable/disable Email Protection Plus on a per address basis
- Modify the spam settings for any protected address
- Manage the passwords used by individual users to access their spam settings and spam quarantine
Administrators do not have the ability to update the IP address/hostname configured for an end user mail server within the Email Protection Plus system. As such, if the end user mail server has its IP address/hostname changed, an account administrator will need to contact our Technical Support team immediately, so the Email Protection Plus service can have its configuration updated accordingly as well. Failure to do so will result in email delivery issues.
Adding New Email Addresses
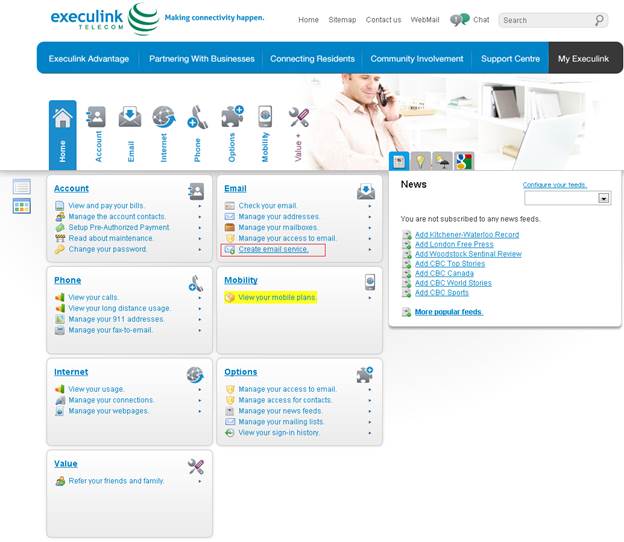
1. Log in to MyExeculink using the administrative credentials that should have been given to you when the Email Protection Plus service for your domain was initially provisioned.
- If you were not initially given those credentials, please get in touch with either our Technical Support team or our Account Support team, and they should be able to help you out.
- For instructions on logging in to MyExeculink, click here.
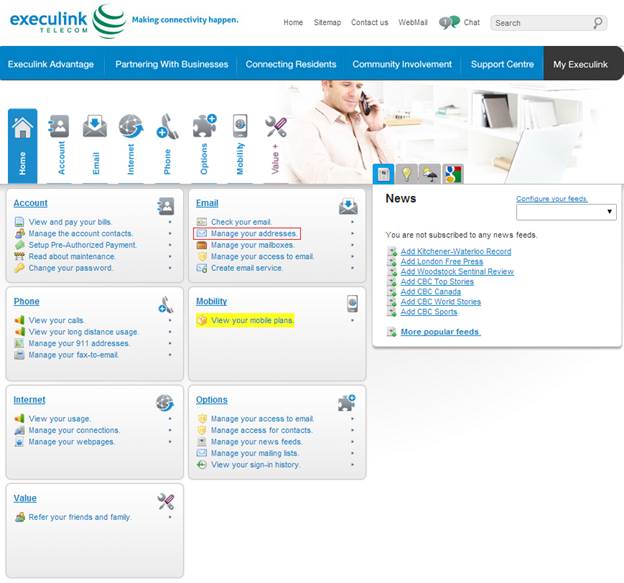
2. Once logged in, click on the Create email service link located in the Email section of the page.
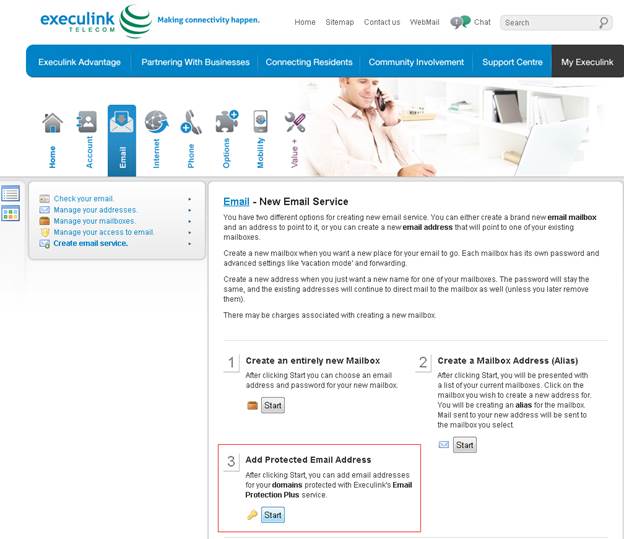
3. Next, click on the Start button under the third option, Add Protected Email Address.
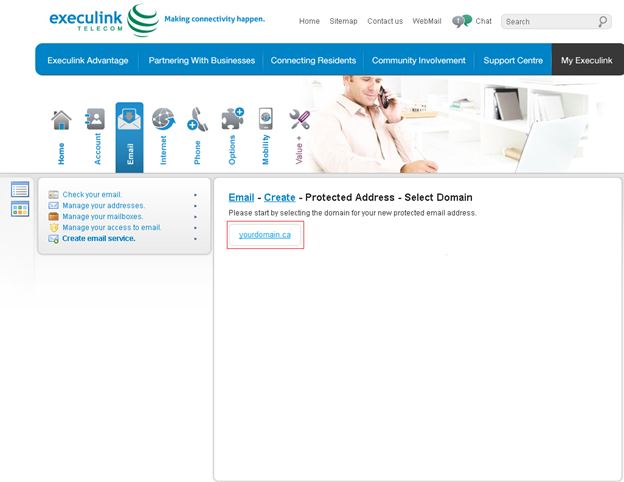
4. You should now be presented with a list of domains which have been set up with the Email
Protection Plus service. Click on the desired domain.
5. The next screen is where you’ll be able to add any new addresses. The form allows you to add up to 10 addresses at once, and to specify whether each address has the Email Protection Plus service On or Off.
Once all of the desired addresses have been entered, click on the Create button. If you have more than 10 addresses that you wish to enter, you can complete this step as often as required.
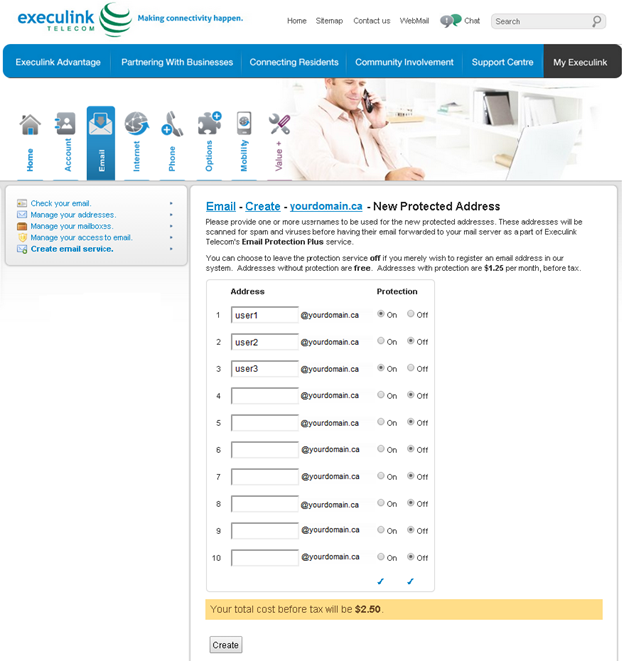
- Important Reminder: All addresses that you wish to receive external email for must be set up on our system, whether they are to be protected by the Email Protection Plus service or not. Any addresses not configured on our system will not be able to receive any external email.
- You will only be billed for those addresses which have the Email Protection Service set to On.
- A running total of the cost for the Email Protection Plus service for the current batch of new
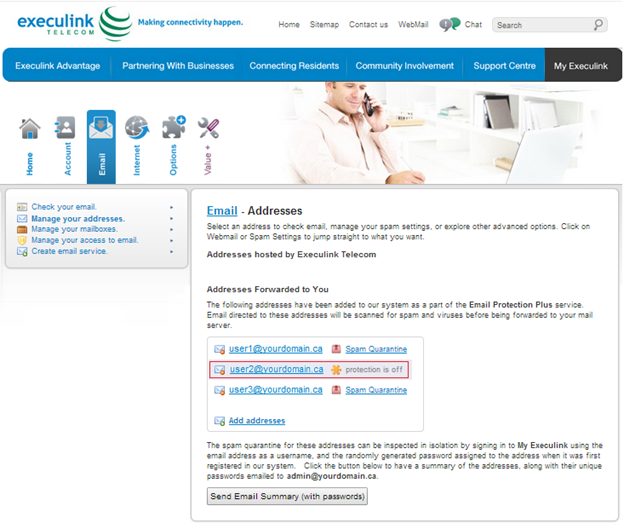
addresses is shown at the bottom of the form, just above the Create button. - In the example above, both user1@yourdomain.ca and user3@yourdomain.ca are to be protected by the service, so both have their Protection option toggled to On. The service is not desired for user2@yourdomain.ca, however, so that address has its Protection option toggled to Off.
6. Once the new addresses are created, you should be taken to the Manage your addresses section of MyExeculink, which will allow you to review any addresses for your protected domain(s). These addresses will appear in the Addresses Forwarded to You section, and will indicate the current status of the Email Protection Plus service.
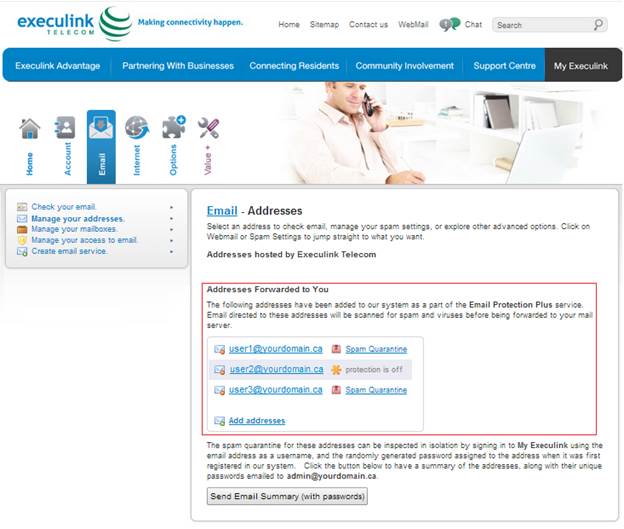
- Addresses with the protection service active will have a Spam Quarantine icon/link beside them.
- Addresses with the protection service inactive will have a yellow/orange snowflake-like icon beside them, along with a note indicating that protection is off.
- Addresses with neither of the aforementioned icons beside them are typically inactive addresses. These are addresses that have been deactivated (so they will not receive email), but they have not yet been completely deleted. They can be left as is (inactive), deleted, or reactivated as desired.
Removing an Existing Address
Only addresses with the Email Protection Plus service disabled can be removed from the system. As such, if you are looking to remove an address which still has the Email Protection Plus service enabled, the service will first need to be disabled as described in the Enabling/Disabling Email Protection Plus for an Existing Address section. Once that’s done, you can follow these steps to completely remove an address from the system. Be warned, however, that whenever you remove an address from the system, all of the quarantined email and spam settings associated with that address will be lost and cannot be retrieved.
1. Log in to MyExeculink as described in step 1 of the Adding New Email Addresses section
above.
2. Once logged in, click on the Manage your addresses link located in the Email section of the
page.
3. All addresses for the protected domain should be listed in the Addresses Forwarded to
You section. Click on the desired address.
- Reminder: Only an address with the protection service disabled can be removed.
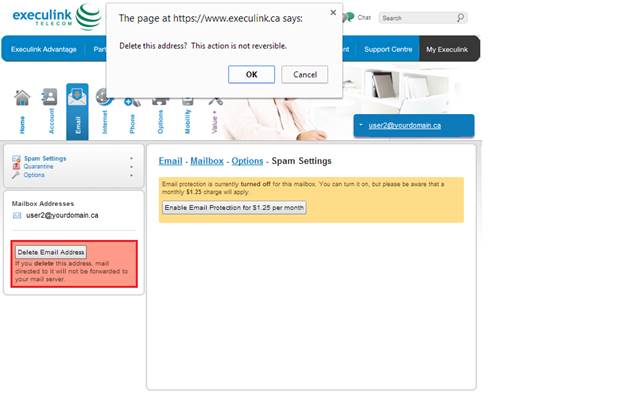
4. Click on the Delete Email Address button on the left. After doing so, a confirmation window will open up asking you to confirm the change. Click OK.
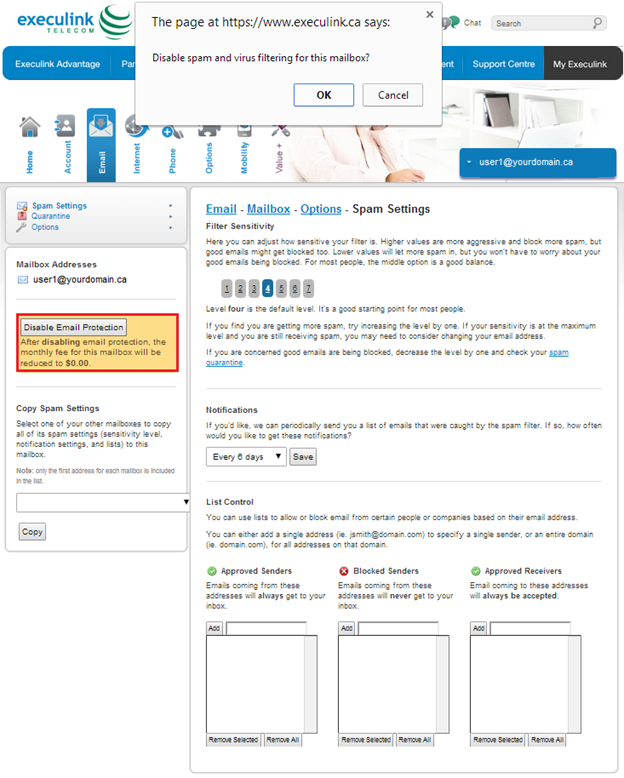
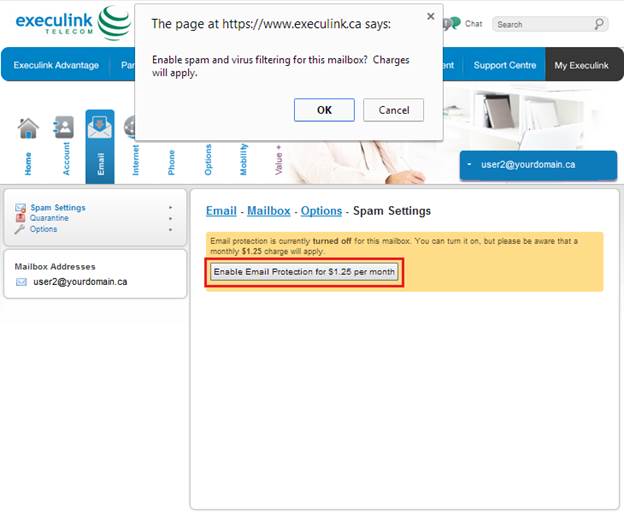
Enabling/Disabling Email Protection Plus for an Existing Address
1. Log in to MyExeculink using the administrative credentials that should have been given to you when the Email Protection Plus service for your domain was initially provisioned.
- If you were not initially given those credentials, please get in touch with either our Technical Support team or our Account Support team, and they should be able to help you out.
- For instructions on logging in to MyExeculink, click here.
2. Once logged in, click on the Manage your addresses link located in the Email section of the page.

3. All addresses for the protected domain should be listed in the Addresses Forwarded to
You section. Click on the desired address.

4. If the address already has Email Protection Plus enabled and you are looking to disable it, click on the Disable Email Protection button on the left. After doing so, a confirmation window will open up asking you to confirm the change. Click OK.
5. If the address has Email Protection Plus disabled and you are looking to enable it, click on the Enable Email Protection for $1.25 per month button. After doing so, a confirmation window will open up asking you to confirm the change. Click OK.
Modifying the Spam Settings for a Protected Address
1. Log in to MyExeculink using the administrator credentials that should have been given to you when the Email Protection Plus service for your domain was initially provisioned.
- If you were not initially given those credentials, please get in touch with either our Technical Support team or our Account Support team, and they should be able to help you out.
- For instructions on logging in to MyExeculink, click here.
2. Once logged in, click on the Manage your addresses link located in the Email section of the page.

3. A list of all addresses for the protected domain should be listed under the Addresses Forwarded to You section. Click on the desired protected address.
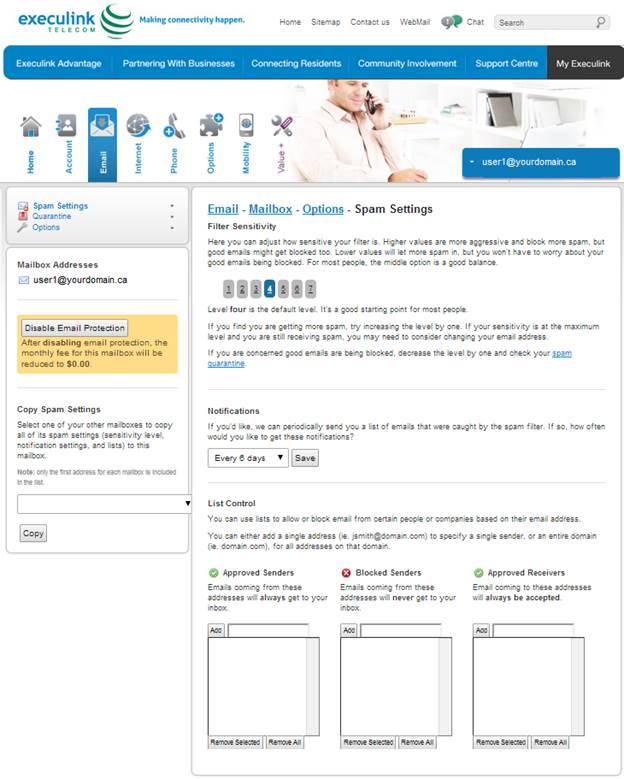
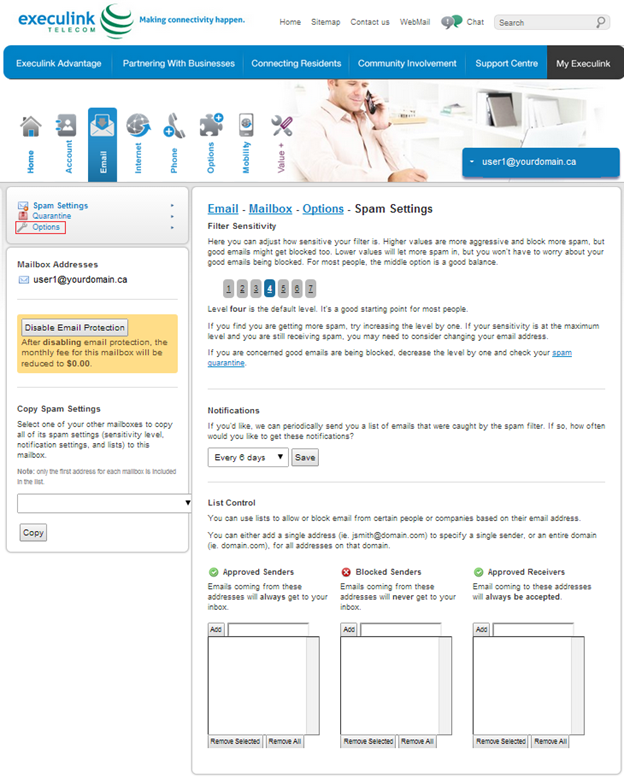
4. This will lead to the Spam Settings section for the selected address, where changes can be made to its filter sensitivity, notification settings, and list control information (approved senders, blocked senders, approved receivers).
- Further information about changing the spam filter’s sensitivity can be found here.
- Further information about changing the spam notification settings can be found here.
- Further information about adding or removing addresses from the various lists in the List Control section can be found here.
Managing Passwords
Every address that is subscribed to the Email Protection Plus service will have an associated password that is used to log in to MyExeculink where various elements of the protection service can be managed. Once logged in with the appropriate credentials, an individual user will be able to view their spam quarantine, change their spam settings, or reset their password. Administrators of the Email Protection Plus service obviously need a way to manage these passwords, and as such, the following options related to password management are available to them:
Change the password for any protected address
Obtain a complete list of all addresses and associated passwords for a protected domain
Changing the Password for a Protected Address
1. Log in to MyExeculink using the administrative credentials that should have been given to you when the Email Protection Plus service for your domain was initially provisioned.
- If you were not initially given those credentials, please get in touch with either our Technical Support team or our Account Support team, and they should be able to help you out.
- For instructions on logging in to MyExeculink, click here.
2. Once logged in, click on the Manage your addresses link located in the Email section of the page.
3. A list of all addresses for the protected domain should be listed under the Addresses Forwarded to You section. Click on the desired protected address.

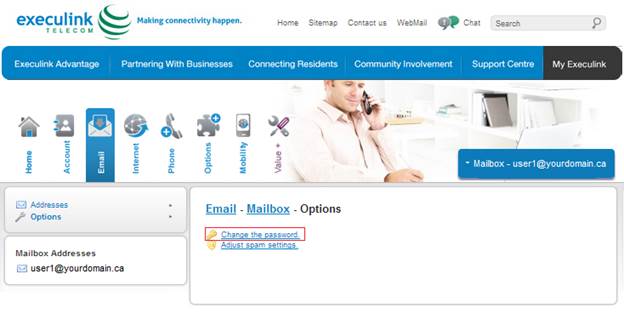
4. Initially, this will take you to the Spam Settings section for the selected address. Click on the Options link in the upper left.

5. Next, click on the Change the password link.
6. Enter the preferred new password into both the New and Confirm fields, then click Save.

- Be sure to adhere to the Password Requirements specified on the page.
Obtaining a List of Passwords for All Addresses for a Protected Domain
1. Follow the same first 2 steps detailed in the Changing the Password for a Protected Address section:
- Login to MyExeculink.
- Click on the Manage your addresses link located in the Email section of the page.
2. Next, scroll down to the very bottom of the page where you should see a Send Email Summary (with passwords) button. Immediately above that button, there will be a short blurb specifying which email address the summary will be sent to.
- If this address is invalid or out of date, please get in touch with either our Technical Support team or our Account Support team to have it updated.
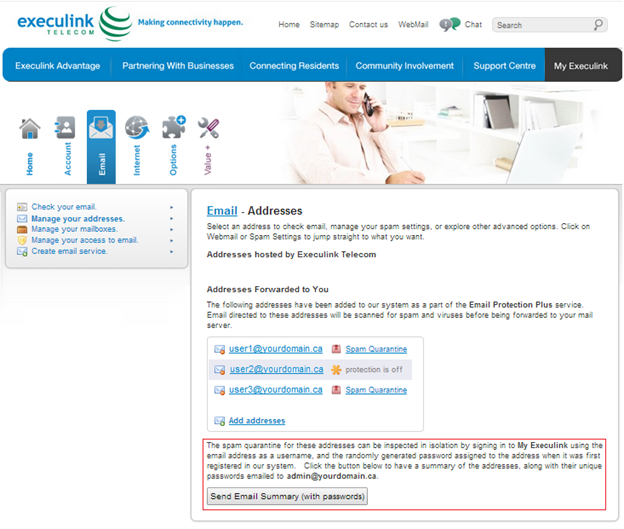
3. Assuming the specified address is correct, click on the Send Email Summary (with passwords) button to have the summary emailed there.
4. The summary email will have these elements:
- Subject: Execulink Telecom Email Protection Summary
- Sending Address: noreply@execulink.com
- The message body will contain a list of all addresses for your protected domain(s), along with their associated passwords for MyExeculink.
Service Management for Individual Users
This section refers to the basic functions that are available to individual users of the Email Protection Plus service. Users will have the ability to do any of the following for their individual addresses:
Check and manage their spam quarantine
Change their MyExeculink password (used to access their spam settings and spam quarantine)
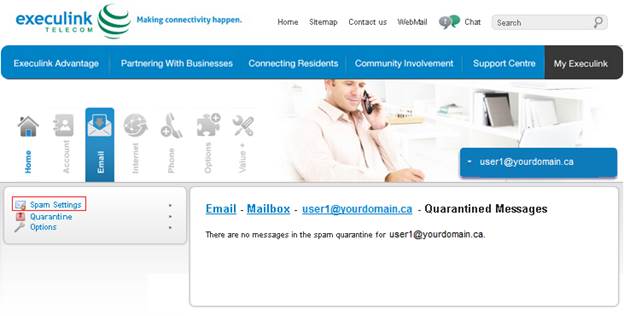
Checking/Managing Your Spam Quarantine
1. Log in to MyExeculink using your full email address and its associated Email Protection
Plus password.
- If you do not know your Email Protection Plus password, please get in touch with the Email Protection Plus service administrator for your organization. That person should be able to retrieve and/or reset your password as needed, via their own administrative MyExeculink access.
- For instructions on logging in to MyExeculink, click here.
2. Immediately upon logging in, you should be automatically deposited into the Spam Quarantinefor your address. If this is not the case, you can simply click on the Quarantine link on the left.
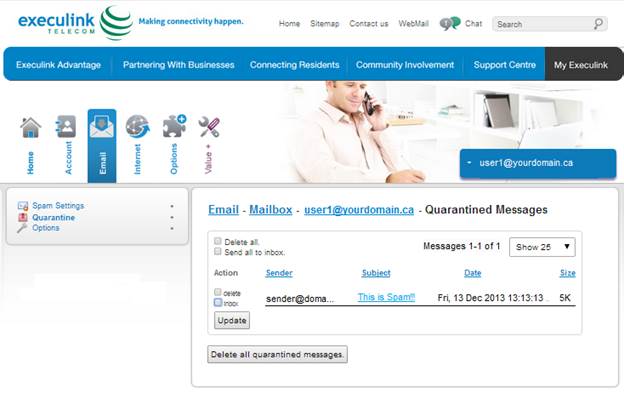
To have a quarantined message (or messages) sent from your Spam Quarantine to your mailbox, click on the inbox checkbox beside the specific message(s). Next, click on the Update button down at the bottom.
To have a quarantined message (or messages) deleted from your Spam Quarantine, click on the deletecheckbox beside the specific message(s). Next, click on the Update button down at the bottom.
To delete all quarantined messages in one fell swoop, click on the Delete all quarantined messages
button down at the bottom.
Modifying Your Spam Settings
1. Log in to MyExeculink using your full email address and its associated Email Protection
Plus password.
- If you do not know your Email Protection Plus password, please get in touch with
the Email Protection Plus service administrator for your organization. That person should be able to retrieve and/or reset your password as needed, via their own administrative MyExeculink access. - For instructions on logging in to MyExeculink, click here.
2. Click on the Spam Settings link on the left.
3. This will lead to the Spam Settings section for the selected address, where changes can be made to its filter sensitivity, notification settings, and list control information (approved senders, blocked senders, approved receivers).
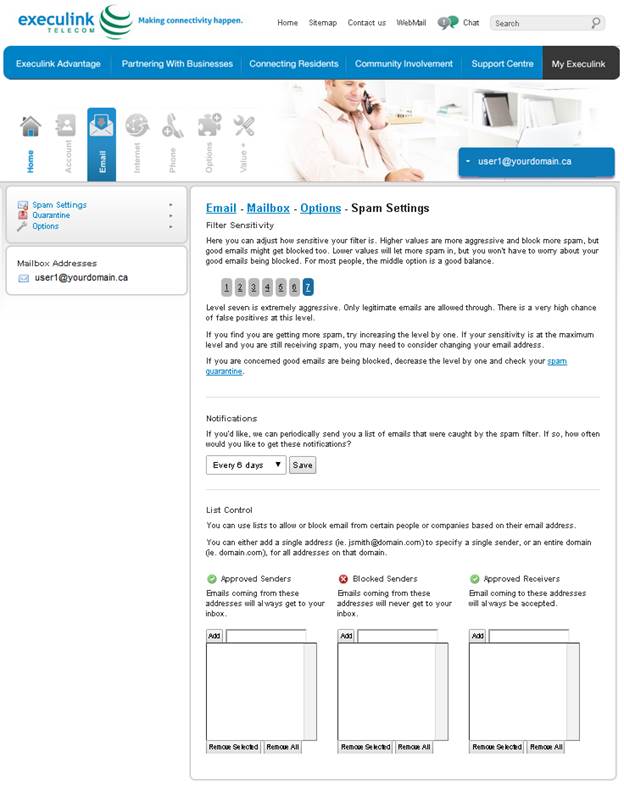
- Further information about changing the spam filter’s sensitivity can be found here.
- Further information about changing the spam notification settings can be found here.
- Further information about adding or removing addresses from the various lists in the List
Control section can be found here.
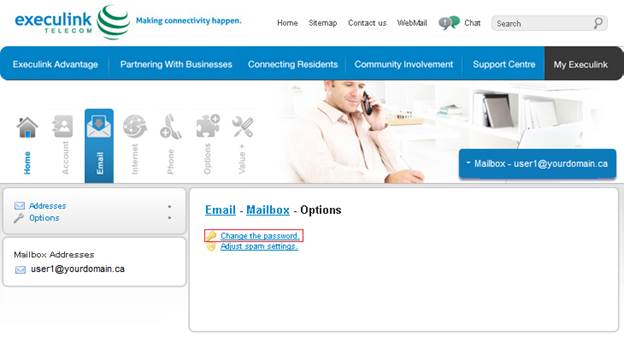
Changing Your Password
To change the password that you use to log in to MyExeculink where you can manage the Email
Protection Plus service for your address:
1. Log in to MyExeculink using your full email address and its associated Email Protection Plus password.
- If you do not know your Email Protection Plus password, please get in touch with the Email Protection Plus service administrator for your organization. That person should be able to retrieve and/or reset your password as needed, via their own administrative MyExeculink access.
- For instructions on logging in to MyExeculink, click here.
2. Click on the Options link on the left.

3. Next, click on the Change the Password link.
4. Enter the preferred new password into both the New and Confirm fields, then click Save.
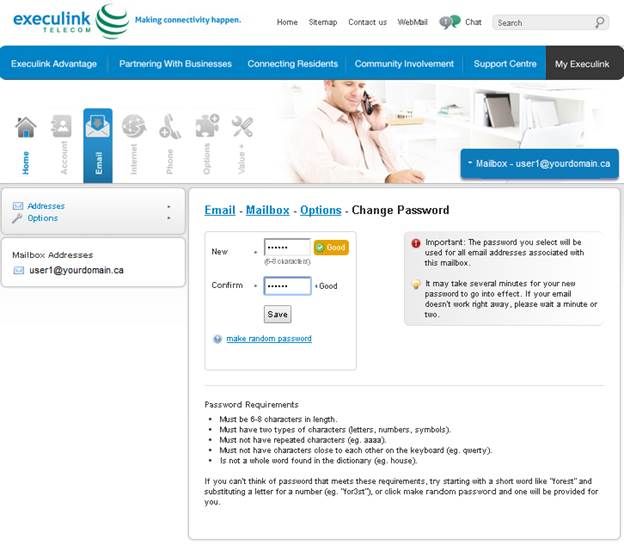
- Be sure to follow the Password Requirements specified on the page
Troubleshooting
Detailed below are a number of possible issues that could arise with the Email Protection Plus service, the probable causes of those issues, and suggested steps to resolve them.
- Information Required for Troubleshooting
- Not Receiving Any Email
- For an Entire Domain
- For a Specific Address
- Email Delays
- Spam Messages Are Not Being Properly Quarantined
- Legitimate Messages Are Being Erroneously Quarantined or Blocked
- Not Receiving Spam Notification Emails
Information Required for Troubleshooting
For almost all cases, if you need to escalate an issue to Execulink’s Technical Support team for further
investigation, please be prepared to provide the following information:
- Domain name
- Specific details for an unsuccessful email delivery attempt (if applicable):
- Date/Time the email was sent
- Sending email address
- Recipient email address
- Problem details
- If there was a bounceback or error message, be sure to provide specifics about it.
With this information, Execulink technicians can examine mail server logs which are instrumental in
diagnosing any email delivery issues, greatly decreasing the amount of time it takes to investigate any issues related to the Email Protection Plus service. Without this information, avenues of investigation are often significantly hindered.
Also, with some issues (i.e. Email Delays), you may be asked to provide the full internet headers for a
problem message that has been received. If you are unsure of how to get this information, our Technical Support team should be able to walk you through it.
Not Receiving Any Emails
If no emails are being received, the first distinction that needs to be made is whether the issue is impacting the entire domain, or just one specific address at that domain. This is important diagnostic information, as both scenarios tend to have very different underlying causes.
For an Entire Domain
The inability to receive email for an entire domain will typically be caused by an issue with the domain’s registration or its DNS records, a misconfiguration with the Email Protection Plus service, or a problem with the end user router/firewall or mail server. Each possible cause has its own elements that require verification.
- From a domain registration / DNS record perspective:
- Confirm that the domain has not expired.
- If it has expired, contact your Registrar to have the domain renewed.
- Confirm that the MX record for the domain is set to mailrouter1.execulink.com.
- If the MX record is set to something else, contact your DNS host to have the MX
record updated accordingly.
- If the MX record is set to something else, contact your DNS host to have the MX
- Confirm that the domain has not expired.
- From an Email Protection Plus service standpoint:
- Execulink’s Technical Support team should be contacted to confirm:
- That the domain has been provisioned correctly for the Email Protection Plus
service. - That the IP address/hostname for the end user mail server has been configured
correctly within the Email Protection Plus system.
- That the domain has been provisioned correctly for the Email Protection Plus
- Execulink’s Technical Support team should be contacted to confirm:
- From an end user router/firewall perspective:
- Confirm that the router/firewall will allow incoming SMTP (TCP port 25) connections from the following IP range – 69.63.44.0 – 69.63.44.255 (69.63.44.0/24).
- If the router/firewall will not allow incoming SMTP requests from the specified IP
range, contact your router/firewall admin to update its config accordingly.
- If the router/firewall will not allow incoming SMTP requests from the specified IP
- Confirm that the router/firewall will allow incoming SMTP (TCP port 25) connections from the following IP range – 69.63.44.0 – 69.63.44.255 (69.63.44.0/24).
- From an end user mail server standpoint:
- Confirm that the mail server is up and running with all required mail services functioning.
- This will be the responsibility of the end user mail server admin.
- Confirm that the mail server is up and running with all required mail services functioning.
For a Specific Address
If only one address for your domain is not receiving email, there are a number of possible culprits:
- The sender(s) mistyped the recipient address.
- In this case, the sender(s) will need to resend the email, being careful to type in the
recipient’s address correctly.
- In this case, the sender(s) will need to resend the email, being careful to type in the
- The address is not provisioned properly in the Email Protection Plus system.
- The Email Protection Plus service administrator for your organization should be able to log in to MyExeculink to setup the required address properly.
- Instructions for managing the service as an admin are detailed in the Service
Management for Admins section.
- Instructions for managing the service as an admin are detailed in the Service
- Execulink’s Technical Support can also help out with this. However, only a valid administrator for the account could request additions or changes to the Email Protection Plus service.
- The Email Protection Plus service administrator for your organization should be able to log in to MyExeculink to setup the required address properly.
- The address is not provisioned properly on the end user mail server.
- The end user mail server admin would need to provision the desired address properly on their mail server.
Email Delays
If incoming emails are taking an inordinate amount of time to finally reach their destination, here are some possible causes that would require further investigation:
- Issues with the sender’s outbound mail (SMTP) server
- The entity responsible for the sender’s SMTP server is the only one that can properly resolve this issue.
- Issues with the end user mail server
- If the end user mail server is unreachable for any reason (high load, server issues, internet connection problems, etc.), any messages that were attempted to be delivered during that time would be queued for future delivery. The longer a system remains unreachable, the longer subsequent redelivery attempts will take.
- Issues with the Email Protection Plus servers
- Problems with the Email Protection Plus servers could also potentially cause email delays.
- Our Technical Support team should be able to verify if the Email Protection Plus servers
are functioning properly.
Having specific details for a delayed email, as outlined in the Information Required for
Troubleshooting section, helps to speed any investigation.
Spam Messages Are Not Being Properly Quarantined
If messages that appear to be obvious spam seem to be eluding the spam filters and winding up in your mailbox, there are a few things to check and/or tweak to fix the issue:
- Verify that the address in question has the Email Protection Plus service enabled. If not, enable it.
- This can be done by the Email Protection Plus service administrator for your organization via their administrative MyExeculink access for the service.
- Instructions for managing the service as an admin are detailed in the Service
Management for Admins section. - Execulink’s Technical Support team can also help with this. However, only a valid
administrator for the account could request additions or changes to the Email
Protection Plus service.
- Instructions for managing the service as an admin are detailed in the Service
- This can be done by the Email Protection Plus service administrator for your organization via their administrative MyExeculink access for the service.
- Verify that the sending address is not on the Approved Senders list. If it is, remove it.
- Any messages sent from addresses on your Approved Senders list will not be subject to quarantine, whether the messages appear to be spam or not.
- Instructions for managing your Approved Senders list can be found in the Modifying Your Spam Settings section.
- Verify that the recipient address is not on the Approved Receivers list. If it is, remove it.
- Any messages sent to an address on your Approved Receivers list will not be subject to quarantine, even if the messages appear to be spam.
- Instructions for managing your Approved Receivers list can be found in the Modifying Your Spam Settings section.
- Consider increasing the spam filter’s sensitivity to block more spam.
- If the spam filter’s sensitivity is set to a low or moderate level, it may be more effective at a higher (more aggressive) setting.
- Instructions for changing the sensitivity of the spam filter can be found in the Modifying Your Spam Settings section.
Failing all of that, there is also the possibility that the message is not being classified as spam as it is not yet being recognized appropriately by the spam filters. However, as the spam filters are constantly updated with new heuristics and spam definitions, such issues should not be long-lasting.
Legitimate Messages Are Being Erroneously Quarantined or Blocked
If messages are being quarantined or blocked that shouldn’t be considered spam, here are a few possible solutions for that behaviour:
- The sending address is on the Blocked Senders list. If so, remove it.
- This would only apply to situations where the message is outright blocked, as any messages originating from addresses on the Blocked Senders list are discarded, not quarantined.
- Instructions for managing your Blocked Senders list can be found in the Modifying Your
Spam Settings section.
- If the spam filter’s sensitivity is set to a moderate or high level, modifying it to a lower (less
aggressive) setting should minimize the instances of false positives.- Instructions for changing the sensitivity of the spam filter can be found in the Modifying Your Spam Settings section.
- If the message contains some element that is completely consistent with what is found in spam messages (i.e. a ‘spamvertized’ URL, etc.), that could cause the filters to flag the message as spam.
- Adding the sender’s address to your Approved Senders list will ensure that future messages from them are not quarantined.
- Instructions for managing your Approved Senders list can be found in the Modifying Your Spam Settings section.
- Adding the sender’s address to your Approved Senders list will ensure that future messages from them are not quarantined.
Not Receiving Spam Notification Emails
If an address is not receiving spam notification emails, there are a few possibilities:
- The address does not have the Email Protection Plus service enabled. If desired, enable it.
- This can be done by the Email Protection Plus service administrator for your organization via their administrative MyExeculink access for the service.
- Instructions for managing the service as an admin are detailed in the Service
Management for Admins section.
- Instructions for managing the service as an admin are detailed in the Service
- Execulink’s Technical Support team can also help with this. However, only a valid
administrator for the account could request additions or changes to the Email Protection
Plus service.
- This can be done by the Email Protection Plus service administrator for your organization via their administrative MyExeculink access for the service.
- Spam notifications are disabled for the address.
- Log in to MyExeculink and enable notifications for the address.
- Instructions for changing the spam notification settings can be found in the Modifying Your Spam Settings section.
- Log in to MyExeculink and enable notifications for the address.
- The notification message is being flagged as spam and quarantined.
- Visit your Spam Quarantine and have the message delivered from there.
- Instructions for managing your Spam Quarantine can be found in the
Checking/Managing Your Spam Quarantine section.
- Instructions for managing your Spam Quarantine can be found in the
- To prevent this from reoccurring, it may be worth adding the sending address associated with the notification message to your Approved Senders list.
- Instructions for managing your Approved Senders list can be found in the Modifying Your Spam Settings section.
- Visit your Spam Quarantine and have the message delivered from there.
- As unlikely as it sounds, it’s possible that no spam has been quarantined for the address.
-
- If no spam has been quarantined, no spam notification email will be sent.