

How to Configure your Premium Wi-Fi Router Settings on MyExeculink
There are many ways to configure your Premium Router using the MyExeculink customer portal. Check out the tutorial video or follow the steps below.
How to Configure your Premium Wi-Fi Router Settings on MyExeculink:
- First, log into MyExeculink using your username and password.

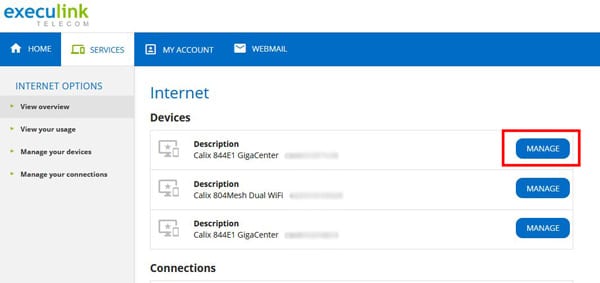
2. In the main blue navigation, click on “Services” and then “Internet”.
3. On the next page, find the technical name for the Premium Router which is “Calix 844E1 GigaCenter” and click the “Manage” button beside it.
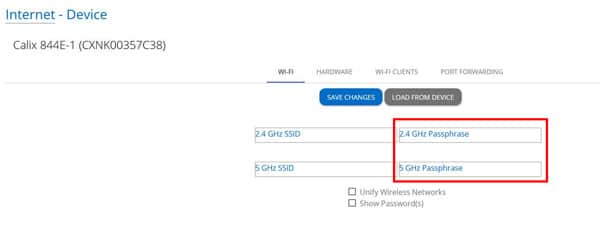
4. On the next page you’ll see a Navigation panel above, starting with WiFI. Here’s where you can manage your Wi-Fi network name and Wifi password. We recommend having 1 network name and password for both the 2.4 and 5ghz frequencies, so that your router can band steer devices to the best network available.
If they match, you will see a blue checkmark beside Unify Wireless Networks. If you prefer to have 2 different credentials for each network, click that checkmark and enter information for each frequency.
5. Selecting the hardware heading will display the router and any Mesh Wi-Fi Nodes on the account, as well as the current IP and status of those devices – if green, these devices are functioning properly. If red, there is an issue affecting your device and you may want to reach out to us for troubleshooting.
In this area you can also choose to manage your own router by clicking the “self managed” button. This option is only recommended for advanced users, who want the ability to manage very specific settings of their device via its web interface.

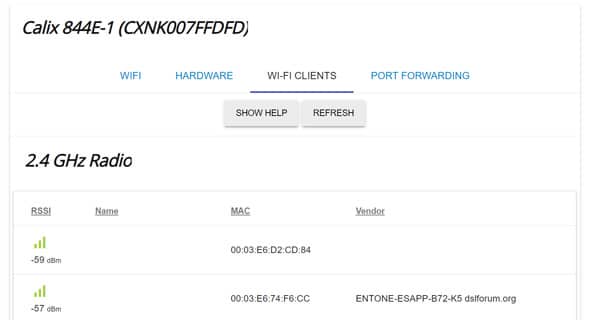
6. In the Wi-Fi Clients, section, you will find a list of devices associated with your Wi-Fi router and nodes if applicable. The list is in ascending order of worst Wi-Fi signal rates, to best with color coded signal rates to better identify each devices current status. Please keep in mind that you must hit the Refresh button in order to update these results as they will not update on their own.
If you click on “show help” it will list a few things that could affect the quality of your signal that you may want to adjust for when placing your Wi-Fi equipment or devices.
7. In the Port Forwarding section, you can set up port forwards necessary for things like gaming servers or security cameras. Here you will see a list of currently active port forwards on the device, along with a brief description, status, how the forward was added, ports, and IP’s involved.
Please note that if the Added section includes UPnP (or universal plug and play) then this was done automatically and could come and go depending on the needs of the devices on the network. UPNP auto-configures port forwarding for devices that require port forwards to function;
Click on the “Create” button to add a new port forward.