

Hosted Exchange FAQ
- What DNS records are required for the Hosted Exchange service?
- What features are included with my Hosted Exchange service?
- How do I access Outlook Web Access (OWA)?
- How do I setup Outlook for my Hosted Exchange service?
- How do I configure my mobile device for my Hosted Exchange service?
- How do I check my spam quarantine?
- How do I modify my spam settings?
- How do I change my Hosted Exchange e-mail password?
- How do I migrate my old Outlook data to my new Hosted Exchange account?
- How do I share a calendar?
What DNS records are required for the Hosted Exchange service?
There are 7 different DNS records required for Execulink’s Hosted Exchange service, as specified below.
In the table below, YourDomain should be replaced with your actual domain name.
| Record Type | Host | Address or Value | Priority |
| MX | YourDomain | mailrouter1.execulink.com | |
| MX | exchange.YourDomain | east.smtp.mx.exch092.serverdata.net | 10 |
| MX | exchange.YourDomain | west.smtp.mx.exch092.serverdata.net | 10 |
| CNAME | autodiscover.YourDomain | ar-east.exch092.serverdata.net | N/A |
| CNAME | autodiscover.exchange.YourDomain | ar-east.exch092.serverdata.net | N/A |
| TXT | YourDomain | v=spf1 include:spf.execulink.com include:spf.serverdata.net ~all | N/A |
| TXT | exchange.YourDomain | v=spf1 include:spf.execulink.com include:spf.serverdata.net ~all | N/A |
Note: When the Hosted Exchange service is initially being provisioned, you should not make (or request) these DNS changes until instructed to by your Customer Implementation Coordinator.
What features are included with my Hosted Exchange service?
The table below specifies which features are available with the various Hosted Exchange packages that Execulink offers.
| Hosted Exchange Package | |||||
|---|---|---|---|---|---|
| Feature | Ultra Lite | Lite | Standard | Full | Description |
| Outlook Web Access (OWA) | OWA is Exchange’s web-based e-mail client. | ||||
| MAPI Support | – | – | The Messaging Application Programming Interface (MAPI) is used to facilitate communication between Outlook and an Exchange Server. | ||
| IMAP Support | IMAP (Internet Message Access Protocol) is a standard e-mail protocol that is used to provide access to a mailbox on a mail server. | ||||
| ActiveSync Support | – | ActiveSync allows for users to synchronize data between Exchange mailboxes and mobile devices. | |||
| Global Address List | A directory that contains entries for every group, user, and contact within an organization’s Exchange Server. | ||||
| Resource Mailboxes | – | – | A mailbox that typically represents a room (i.e. a conference or meeting room) or a piece of company equipment (i.e. a projector, screen, etc.), rather than a person. These mailboxes can be used to reserve resources to ensure their availability when needed. | ||
| Distribution Lists | – | – | A distribution list is a group of e-mail addresses. Authorized individuals can send a message to every address on the list by simply e-mailing the list address itself. | ||
| Public Folders | – | – | 10 | 10 | The number of public folders available per package is shown here. |
| Public Folder Storage Limit | – | – | 512 MB | 512 MB | The storage limit for public folders. |
| Shared Folders, Tasks, Contacts, Calendars | – | – | Allows for the sharing of various elements (folders, tasks, contacts, calendars) with other Exchange users. | ||
| Group Scheduling | – | – | Allows users to view the combined schedules of individuals and resources, and to schedule meetings accordingly. | ||
| Outlook License | – | – | – | Provides a licensed version of Outlook 2010 or 2013. | |
How can I access Outlook Web Access (OWA)?
To access Outlook Web Access (OWA), simply browse to the Execulink Outlook Web Application and log in with your Exchange e-mail address and its associated password.
How do I setup Outlook for my Hosted Exchange service?
The Outlook setup will vary somewhat depending upon the type of mailbox being configured Full/Standard Exchange vs Exchange Lite/Ultra Lite), your Operating System (OS), and the version of Outlook being used. This section provides instructions and screenshots specific to Outlook 2010.
MICROSOFT:
The Auto-discovery method is the recommended set-up on Windows 10. The following guide was built using Windows 10, account for use in Outlook 2016. This guide can also be followed for Windows 7/8 environments. For other e-mail software clients such as Thunderbird, Incredimail, etc., please refer to your support documentation for set-up assistance.
Click here for the Windows walkthrough.
MACINTOSH:
The Auto-discovery method can be used when setting the account up directly within the operating system. When using Outlook, it is recommended to perform the manual set-up. Steps for both methods will be provided here. For other e-mail software clients such as Thunderbird, Incredimail, etc., please refer to your support documentation for set-up assistance.
Click here for the Macintosh walkthrough.
Exchange Lite/Ultra-Lite:
Exchange Lite comes packaged with ActiveSync and can utilize the walkthroughs provided above. Exchange Ultra-Lite uses IMAP email configurations to work within various email software clients.
Click here for the Ultra-Lite walkthrough.
Windows:
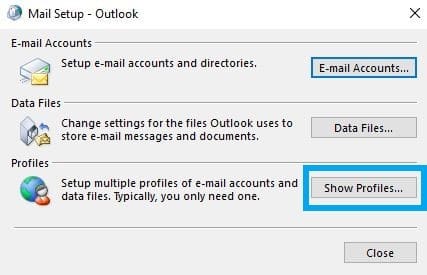
- From within your Control Panel, open the Mail application.

- Click on the “Show Profiles” button in the Mail Setup window that opens up.
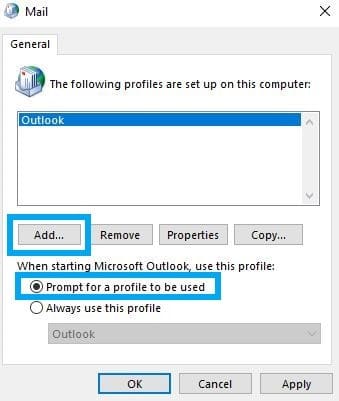
- On the next window, ensure that Prompt for a profile to be used is selected, then click on the “Add” button.
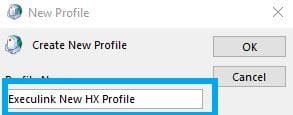
- Type in a name for your new profile, then click “OK”.
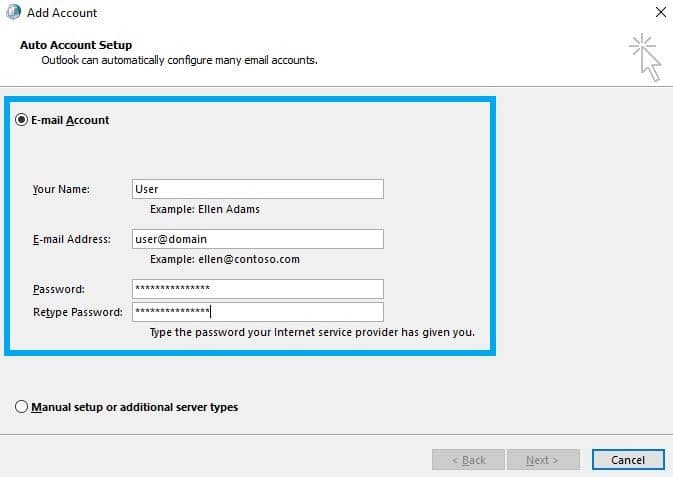
- This should spawn the “Add New Account” window where you’ll be prompted to enter your name and your Hosted Exchange mailbox credentials. Click “Next” once finished.
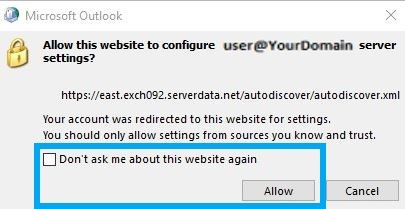
- This will start the auto-discovery process where Outlook attempts to automatically obtain your settings from the Exchange server. At this point, you may be prompted to allow this website to configure your Exchange account’s server settings, as shown below. If so, click “Allow” to continue. If there are issues making an encrypted connection to the server, you will be prompted to click “Next” to continue the attempts via an unencrypted connection. Do so.
- If all goes well with the auto-discovery process, you should see the following window indicating success. Click “Finish” to complete the setup.

Macintosh – MacMail Configuration
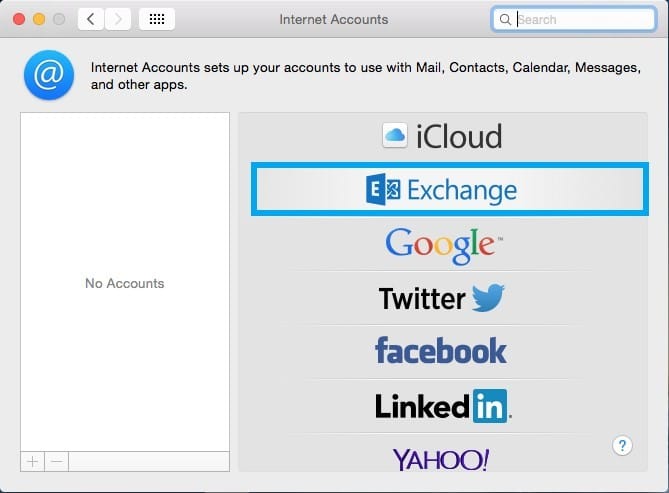
- Click on System Preferences > Internet Accounts.
- Select the Exchange account type from the list provided.
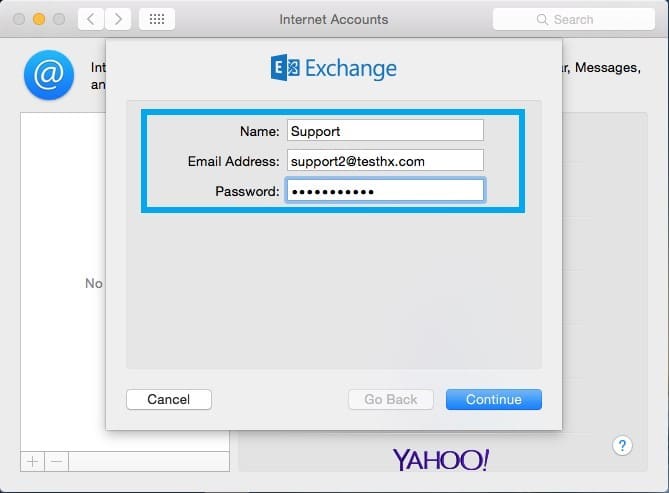
- Enter your full e-mail address into the Username field. Select “Continue.”
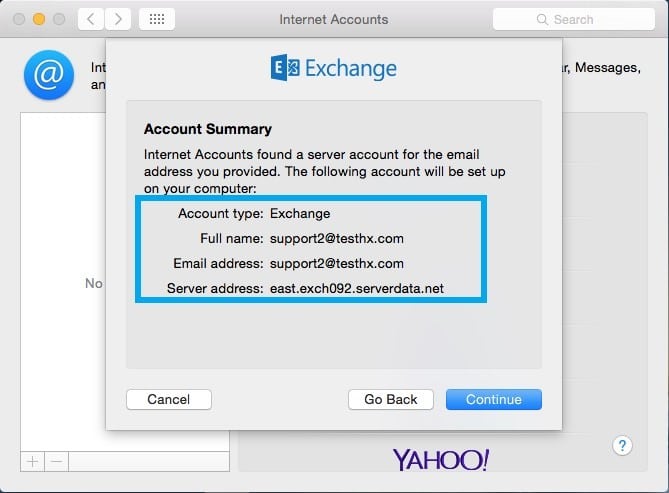
- Auto-discovery will locate your server settings and display them on screen. Make sure that the information matches below and select “Continue”.
- The final step will prompt you to enable the apps that use the Hosted Exchange account. Please ensure that all five are active and select “Done”. Congratulations, you e-mail service is now set-up and ready to use with your MacMail program!
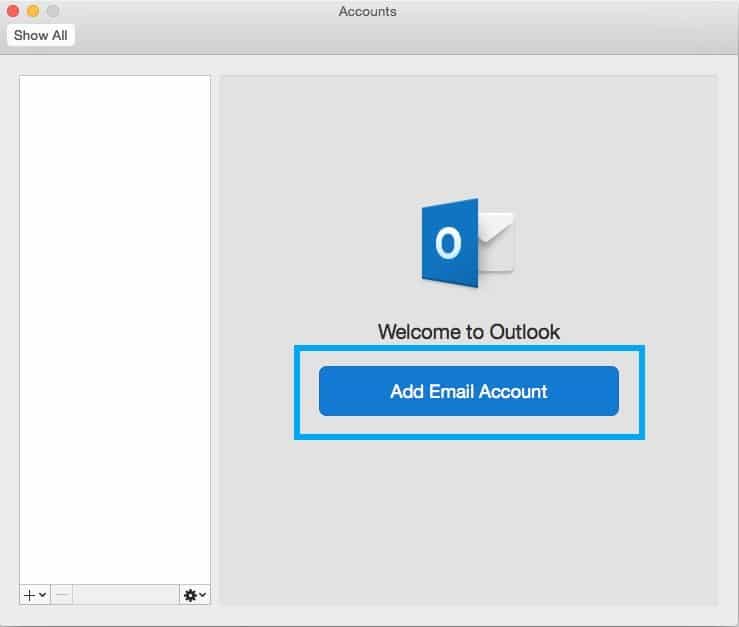
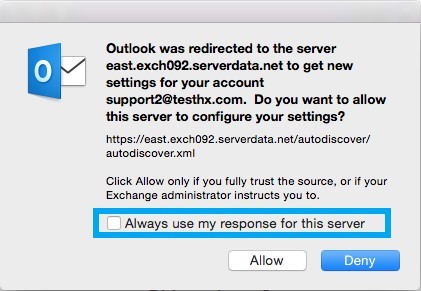
Macintosh – Outlook Configuration
- Open Outlook. Go to Tools > Accounts > Click on “Add Email Account”.
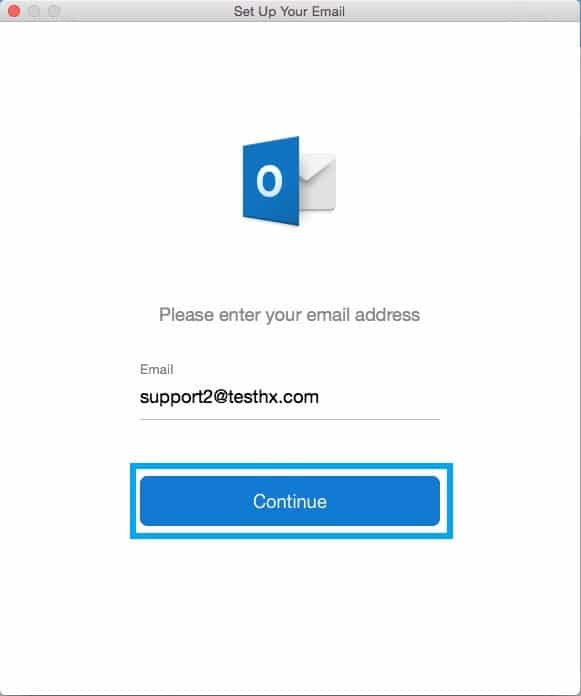
- Enter your e-mail address and click “Continue”.
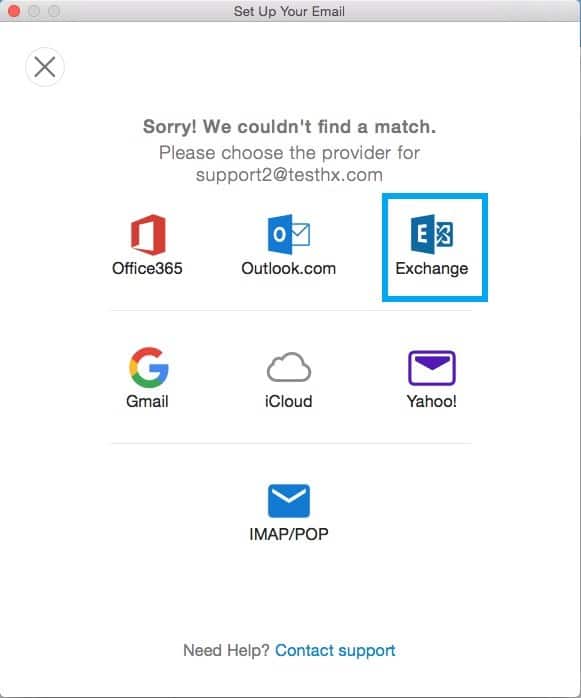
- Outlook will likely not find the server settings automatically. You will be presented with the following screen. Please click “Exchange” to continue.
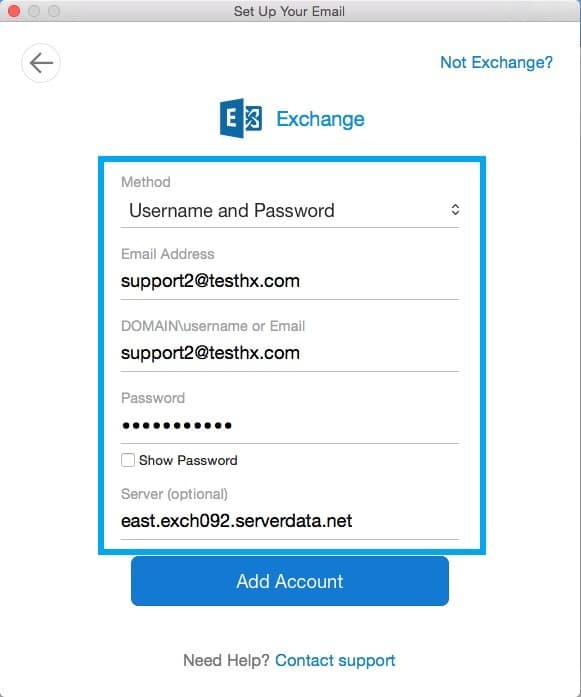
- Enter the Hosted Exchange server settings as you see below. NOTE: Both Email address and Domain are the same details: your full email address. Click on “Add Account” to proceed.
- An auto-discover message will appear asking for permission to access the following server. Ensure that the servers match between your device and the guide, click “Always use…” then click “Allow”.
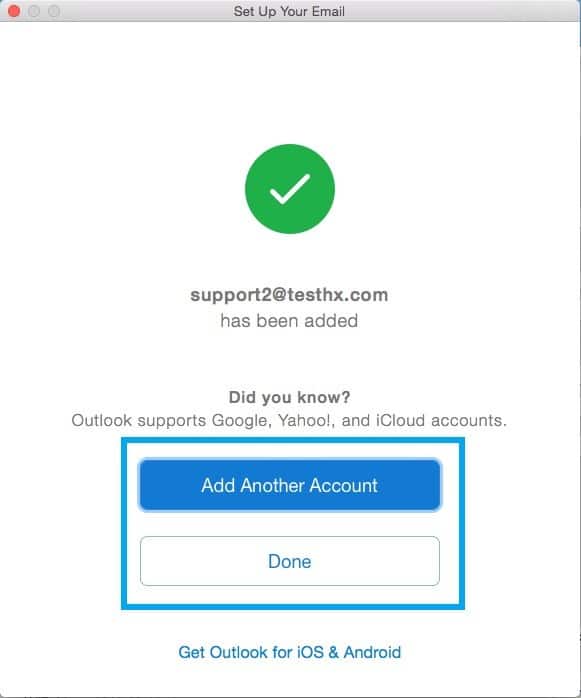
- Congratulations! Your email is now configured and ready for use. Please click on “Done” to close the window or “Add Another Account” if you wish to have more.
Exchange Lite/Ultra Lite Mailbox – Manual Configuration
-
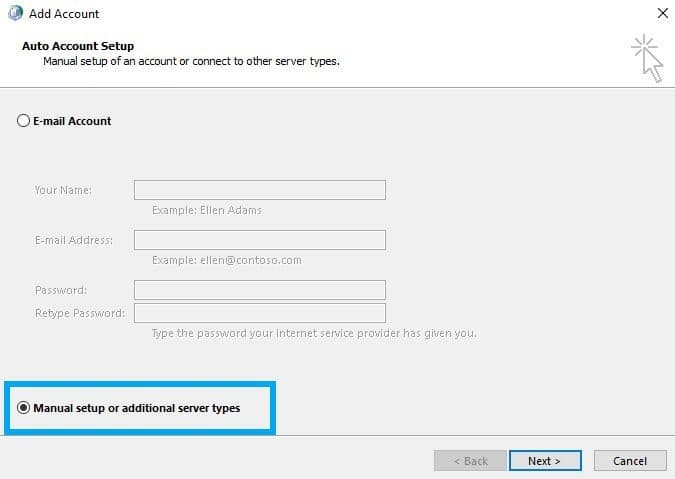
- The guide below was made using Outlook 2016 on Windows 10. Please follow steps 1-4 of the Windows guide shown above.
- When the “Add New Account” window opens, select “Manually configure server settings or additional server types,” then click “Next”.
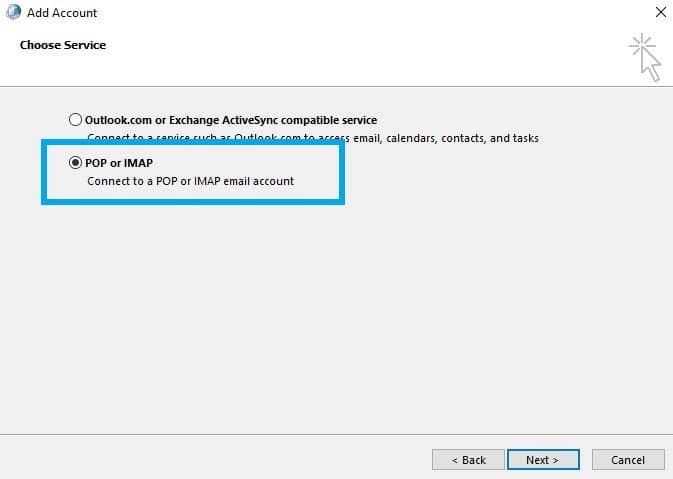
- Select “POP or IMAP” as your account type and click “Next.”
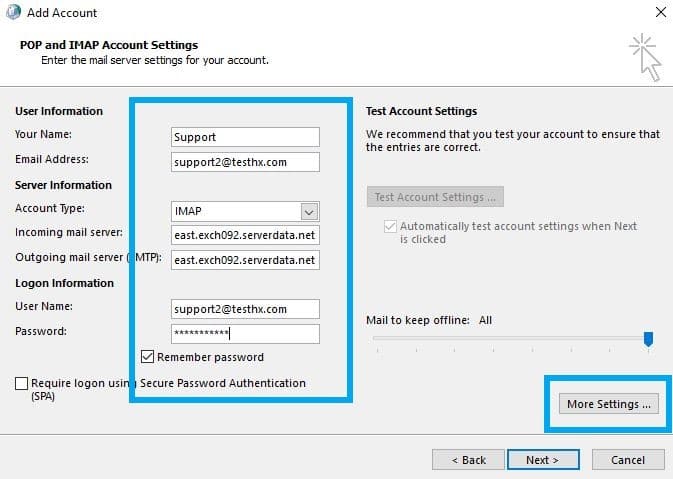
- Fill in the fields as follows, then click on More Settings.
- Your Name: The display name for your e-mail account. (The name that people see when you e-mail them.)
- E-mail Address: Your e-mail address.
- Account Type: IMAP
- Incoming mail server: east.exch092.serverdata.net
- Outgoing mail server: east.exch092.serverdata.net
- User Name: Your e-mail address.
- Password: Your e-mail password.
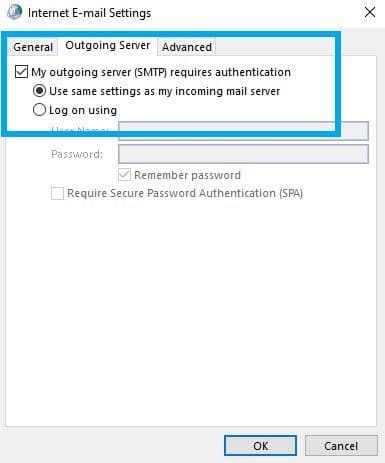
- On the Outgoing Server tab on the Internet E-mail Settings window:
- Ensure there is a check beside My outgoing server (SMTP) requires authentication.
- Ensure that Use same settings as my incoming server is selected.
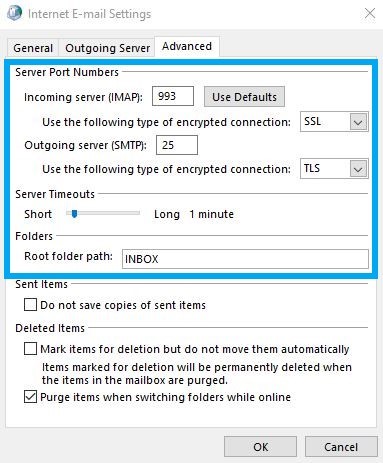
- On the Advanced tab:
- In the Incoming server (IMAP) section, select SSL from the Use the following type of encrypted connection drop-down. The port number should be automatically updated to 993.
- In the Outgoing server (SMTP) section, select TLS from the Use the following type of encrypted connection drop-down. The port number should remain as 25.
- Click “OK” to return to the Internet E-mail Settings window, then click “Next”. Outlook should now attempt to test your account settings. Assuming all goes well, you should see green checkmarks beside Log on to incoming mail server (IMAP) and Send test e-mail message, as below. Click “Close” to proceed, followed by “Finish” Congratulations! Your new Hosted Exchange Ultra-Lite service is ready to use.
How do I configure my mobile device for my Hosted Exchange service?
The method for configuring your mobile device for your Hosted Exchange account is going to vary based on a number of elements, such as the manufacturer, the carrier, the OS version being used, and the e-mail application. This section will contain the basic settings required for configuring Exchange accounts on mobile devices, followed by a few examples on a few different devices. If your specific setup is not covered, the information provided should still be applicable to your setup.
Mobile Device Required Settings
These are the settings required for configuring your Hosted Exchange account on most mobile devices.
Update Server/active sync server/ incoming server
- E-mail Address: Your Hosted Exchange e-mail address (for example: user@domain.com)
- E-mail Password: Your Hosted Exchange e-mail password.
- Domain: (blank)
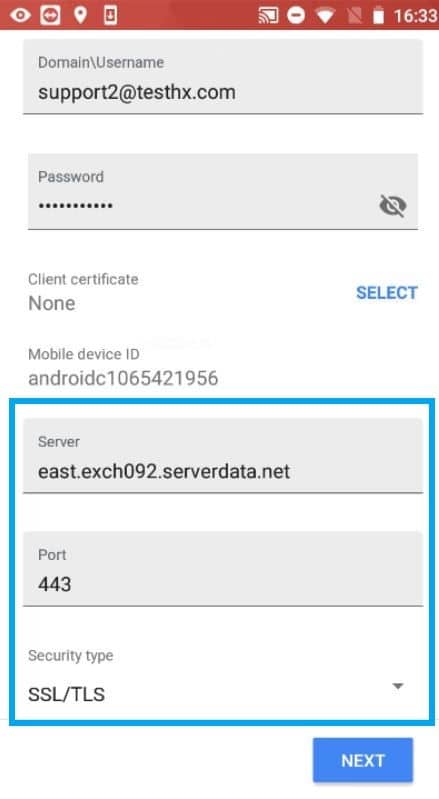
- Server / ActiveSync Server / Incoming Server: exch092.serverdata.net
- Security: SSL/TLS (automatic)
- Port: 443 (automatic)
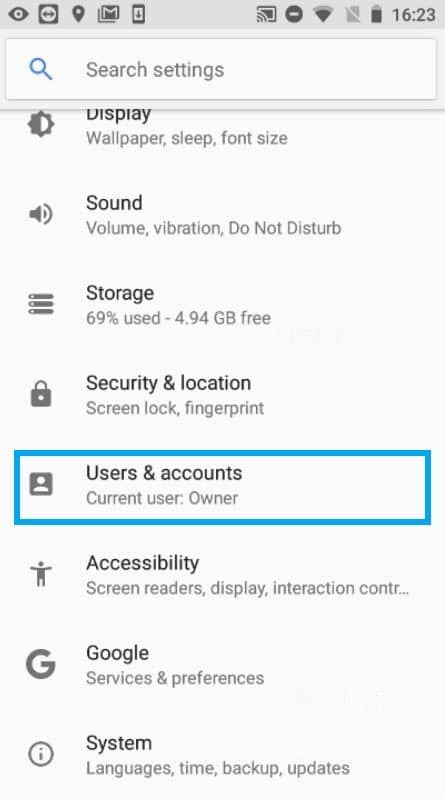
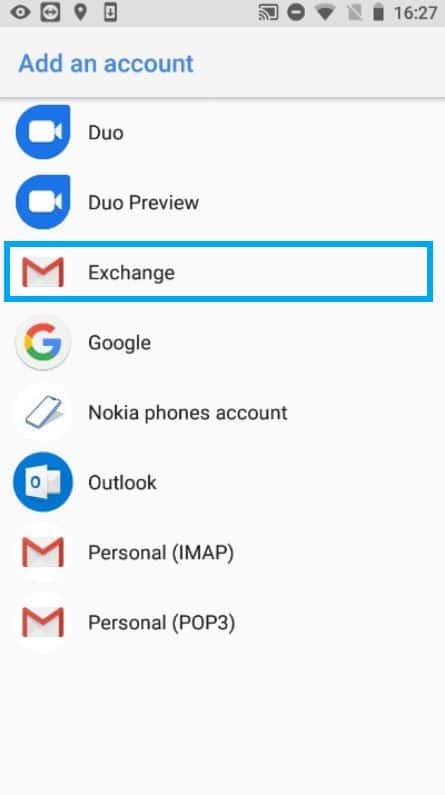
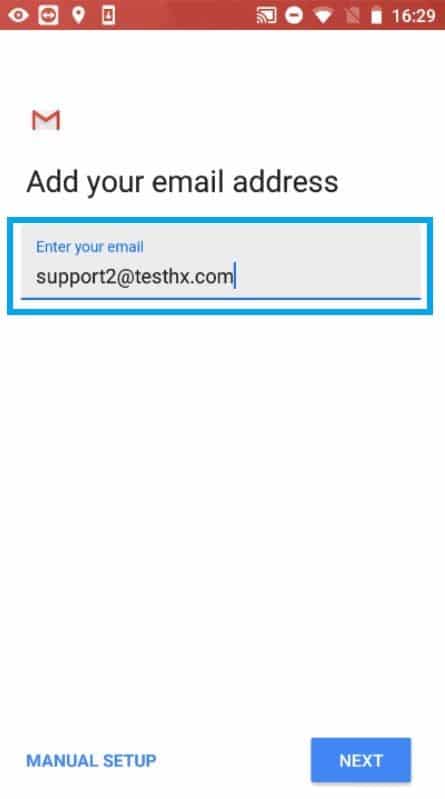
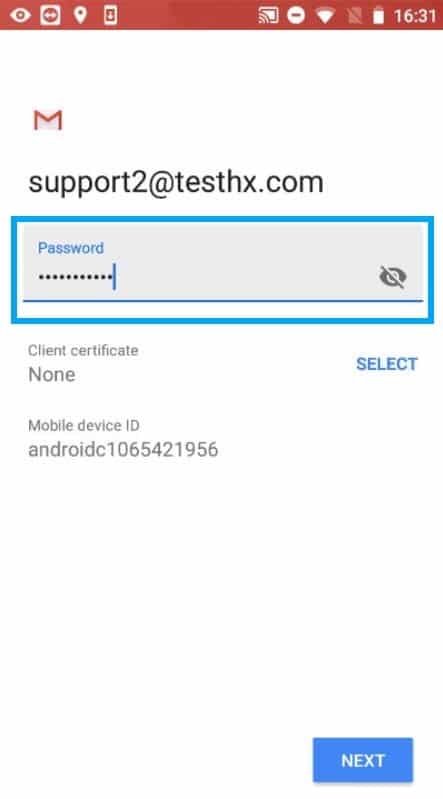
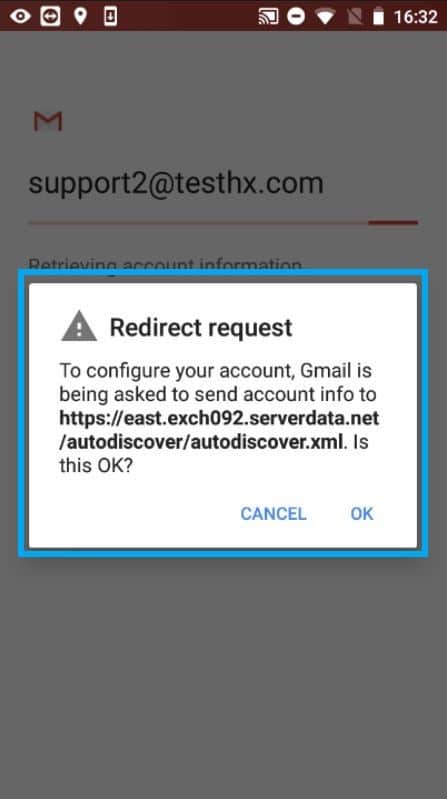
Android Setup
(NOTE: This guide was created using a Nokia 5 running Android 8.1.0 Oreo. You may anticipate some slight variations of the following screens depending on the software and manufacturer of your device).
- Under Settings, click on Users & Accounts.
- Click on Add Account.

- Select Exchange or Microsoft Exchange ActiveSync from the list. The rest of this guide assumes that you have clicked on Exchange, but the two setups are quite similar.
- Enter your Exchange e-mail address and click Next.
- Enter your Exchange e-mail password and click Next.
- After attempting to retrieve your account information, a Redirect request window should open up, as shown below. Click OK to proceed.
- The incoming server settings on the subsequent window should auto-populate as shown below. Click Next.
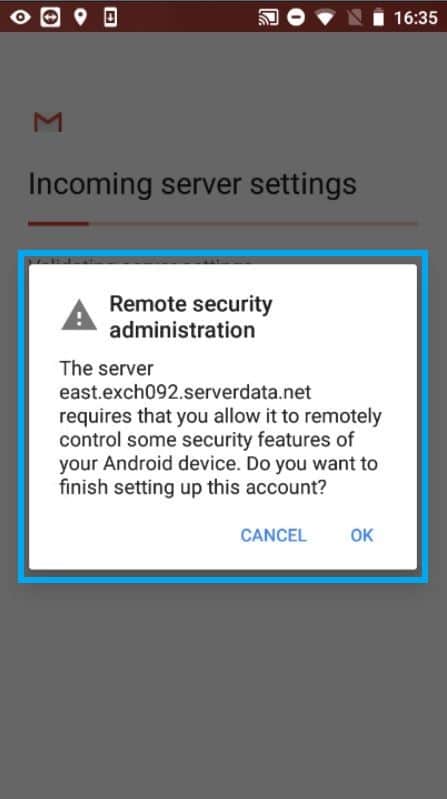
- After attempting to validate the server settings, a Remote security administration window should pop up. Click OK.
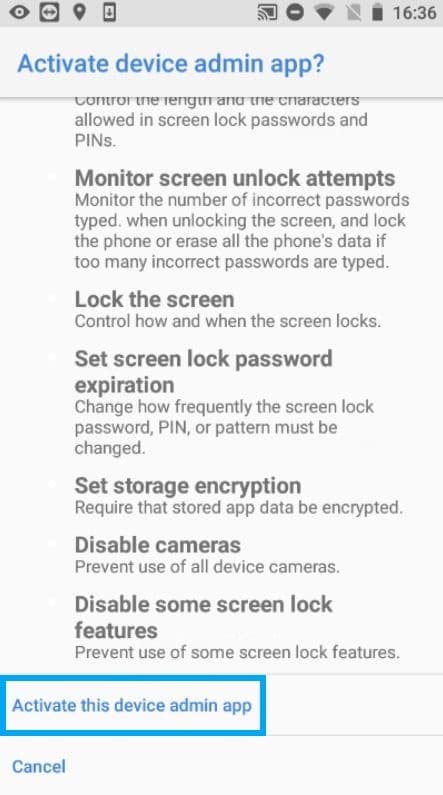
- On the Activate device administrator window, click on Activate. NOTE: Scrolling all the way to the bottom of this screen may be necessary.
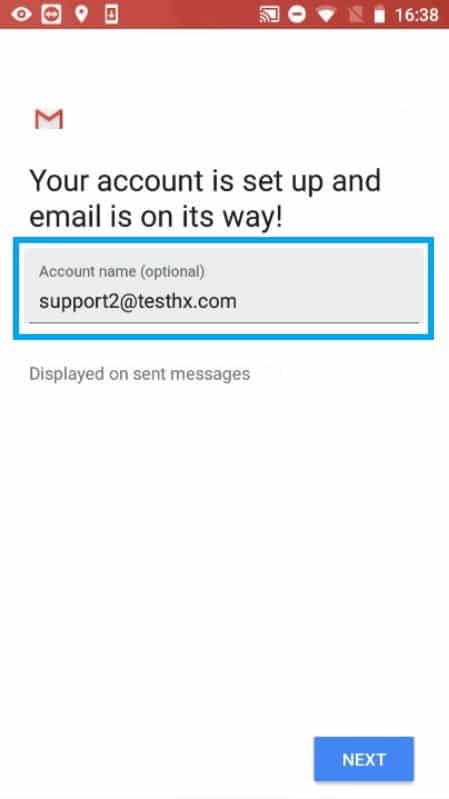
- Your account is set-up and good to go! Enter a name for your account, then click ‘Next’ to complete the setup. (By default, your account name will be your e-mail address.)
iPhone / iPad Setup
NOTE: This guide was developed using an iPhone 8s running iOS 12.1.4. You may expect variations of the windows depending on the version of operating system and hardware that you are using.
- In Settings, scroll to Password & Accounts.
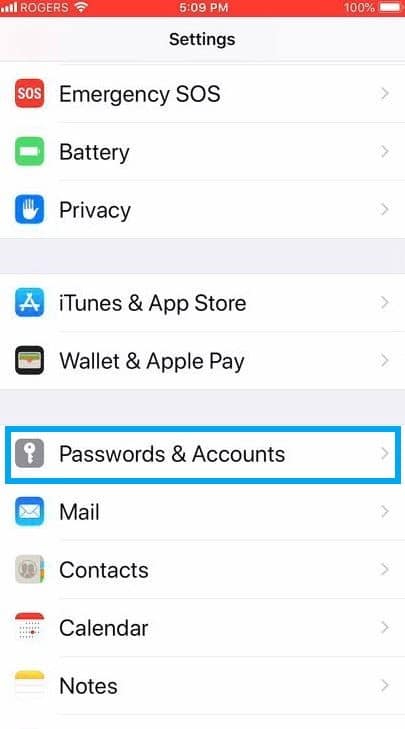
- Select Add Account.
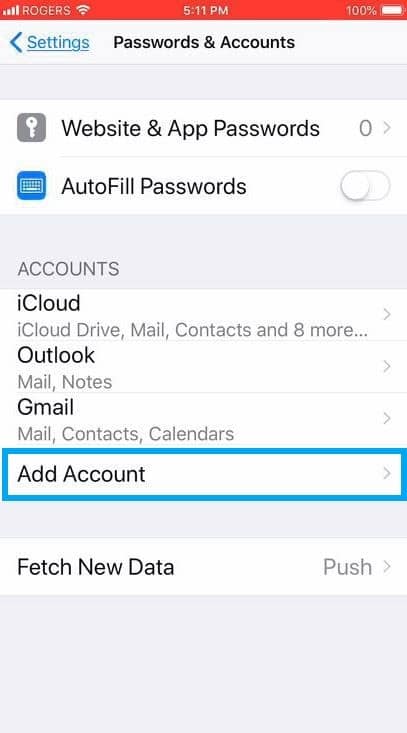
- Select Exchange.
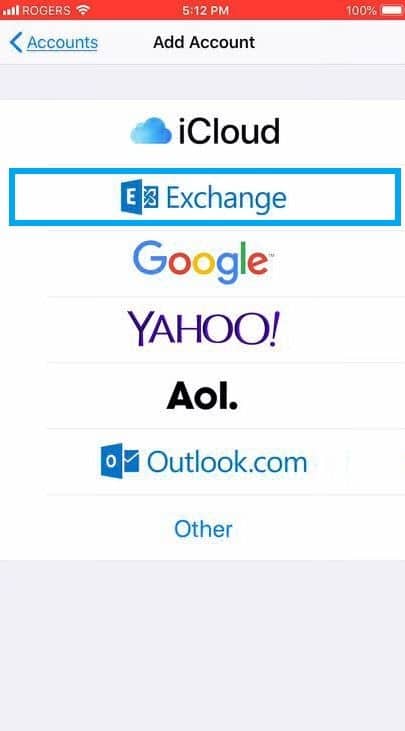
- Enter your e-mail address and account description.
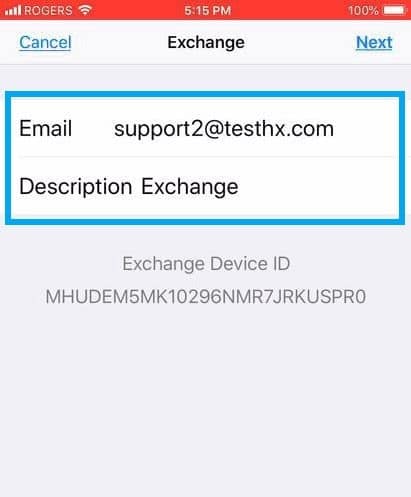
- Input the following information. Where “Email” and “Username” are requested, please input the full account. NOTE: Domain is optional and will not be required for our service.
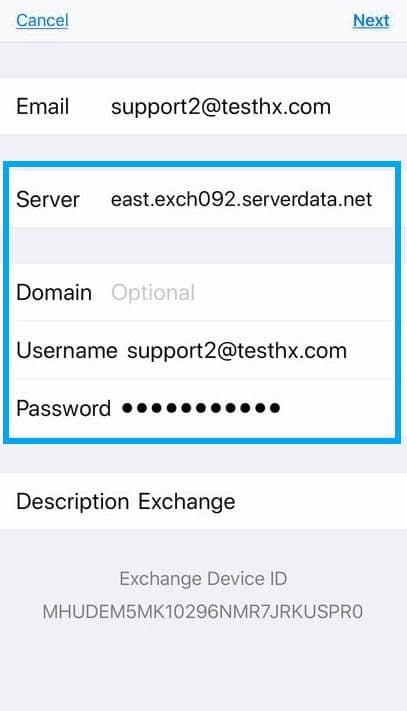
- Tap “Next” and you will see a series of blue checkmarks appear to the right. This result means that the set-up was successful.

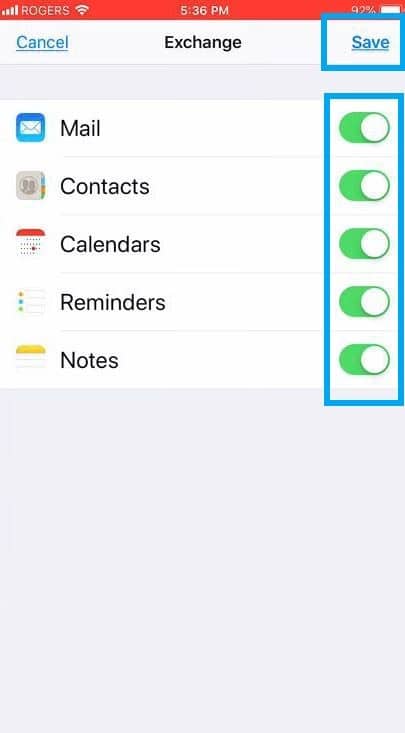
- Ensure that these five function switches are all enabled to enable the full service synchronization. Tap “Save” to complete the set-up.
Windows Phone 8 Setup
- Click on Settings.
- Click on email + accounts.
- Click on add an account.
- Select Outlook from the list of available accounts.
- Enter your Exchange e-mail address and password, then click sign in.
- If all goes well, your device should automatically discover your server settings. Otherwise, you will need to enter the required information in manually. (See the Required Settings section for details.)
How do I check my spam quarantine?
There are a couple of different ways to check your spam quarantine.
-
-
- Via E-mail
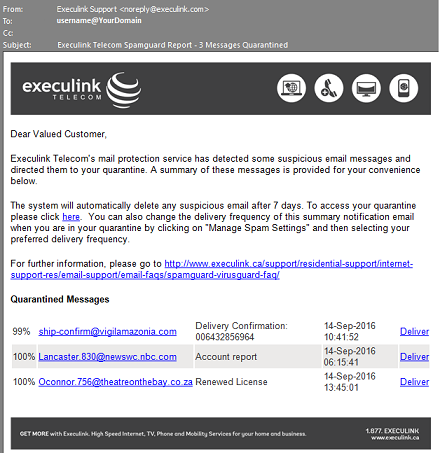
- By default, you should be receiving daily quarantine reports via e-mail from our Spamguard system.
- These Spamguard reports will list any e-mails that have been quarantined since the last report was sent out. They should also contain links which will allow you to selectively deliver quarantined messages directly to your Inbox.
- An example of this e-mail is shown below.
- Via MyExeculink
- Log in to MyExeculink with your e-mail credentials. (How To?)
- Ignore the Webmail interface that may open up. This is not your Outlook Web Access (OWA).
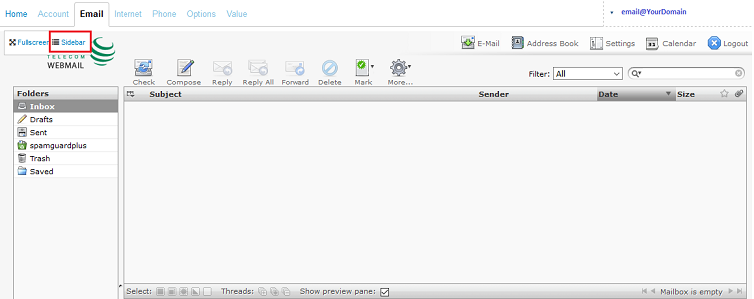
- Instead, click on the Sidebar link, as indicated by the red box in the screenshot below:
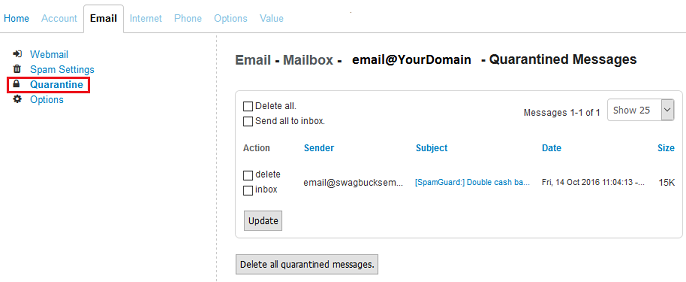
- Next, click on the Quarantine link in the now visible sidebar on the left. The quarantined messages for your mailbox will be displayed as shown below.
- Via E-mail
-
How do I modify my spam settings?
Follow the same steps detailed in the Via MyExeculink section immediately above, except select Spam Settings from the sidebar on the left instead of Quarantine. Further information about the various spam settings and how to tweak them can be found here.
How do I change my Hosted Exchange e-mail password?
To change the password for your Hosted Exchange mailbox, please reach out to our Customer Care team via phone (1-877-334-7641). Once you have been appropriately verified as a valid contact for the account, our team will be able to reset the password for you.
How do I migrate my old Outlook data to my new Hosted Exchange account?
This process involves 3 key steps:
- Export your existing data to a .pst file.
- Setup your new Hosted Exchange account in Outlook.
- Import your previously exported data into your new Hosted Exchange account.
Exporting your Data
To export your existing data to an Outlook .pst file, follow the steps below. Note: The screenshots in this section were taken from Outlook 2010.
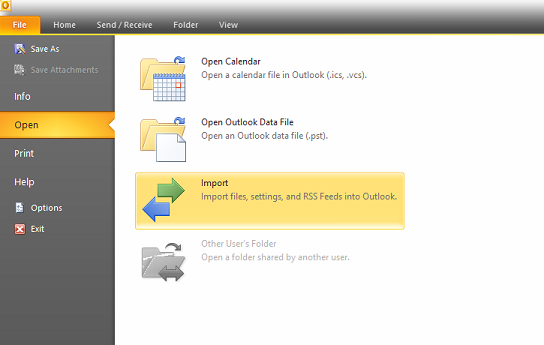
- Under the File menu, click on Open, and then Import.
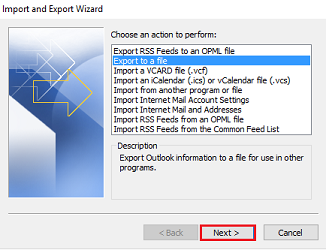
- Select Export to a file, then click Next.
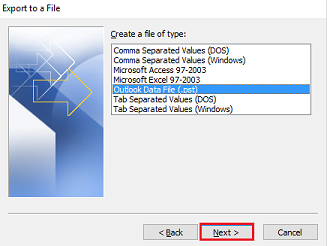
- Select Outlook Data File (.pst), then click Next.
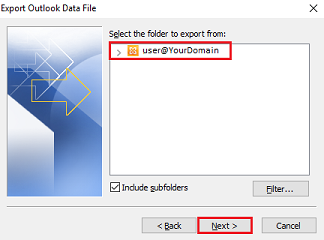
- Select the folder/account that you wish to export from. Select the entire account and not just the Inbox, to ensure that you’re backing up all elements, including subfolders, contacts, calendars, etc. Click Next.
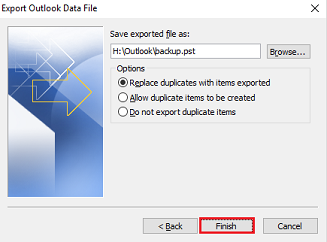
- You will now be prompted to specify the location and name of the export/backup file. If you wish to change the default save location, click Browse to browse to the desired folder on your computer. Click Finish to begin the export process.
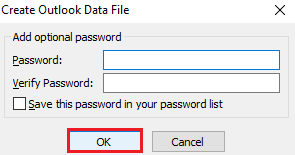
- Next, Outlook will prompt you to enter a password to password-protect your exported data. While you’re certainly welcome to do so, this step is entirely optional. If you do choose to set up a password, ensure that you remember it. Otherwise, if you forget the password, you may need to go through the export process again. Whatever you decide, click OK to continue.
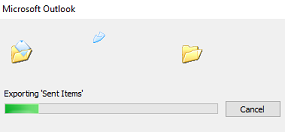
- Outlook will now begin exporting your data and should display a window indicating its progress. The greater the amount of data being backed up, the longer this process will take. With really large files, this could take longer than an hour. Once completed, the progress window should disappear. Feel free to browse to the folder where you saved the file to ensure that it’s there as expected.
Setting up Your Hosted Exchange Account in Outlook
The Outlook setup process has already been detailed in the ‘How do I setup Outlook for my Hosted Exchange service?‘ section above.
Importing your Data
Once you have your new Hosted Exchange account set up in Outlook, you can begin the process of importing your old data into your new account. Note: The screenshots in this section were taken from Outlook 2010.
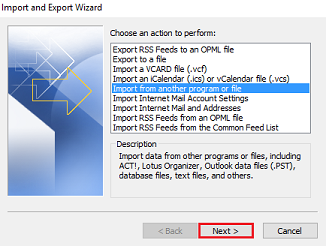
- Under the File menu, click on Open, and then Import.

- Select Import from another program or file, then click Next.
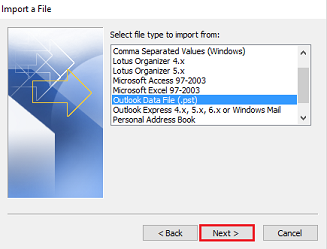
- Select Outlook Data File (.pst), then click Next.
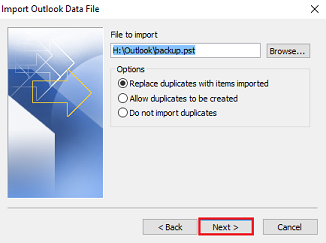
- On the Import Outlook Data File window, click on the Browse button and then browse to the location of your backed up .pst file. Once you’ve located it, either double-click on it or highlight it and click Open. Ensure that the correct file is displayed in the File to import field before clicking Next to proceed.
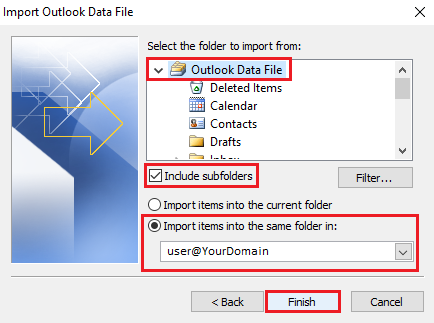
- When selecting the folder to import from, ensure that you select the entire Outlook Data File, and not just a specific element within that file (i.e. your Inbox). There should also be a checkmark beside Include subfolders. In the lower portion of the window, select Import items into the same folder in, and then select your Hosted Exchange account from the drop down. Click Finish to begin the import process.
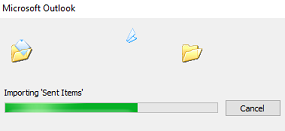
- Outlook will now begin importing your data, and should display a progress window while doing so. As with the exporting process, the greater the amount of data being imported, the longer this process will take. With really large files, the process could take more than an hour. Importing generally takes longer than exporting as well. Once everything has been completed, the progress window should disappear.
How do I share a calendar?
Outlook 2010
-
-
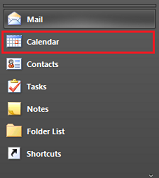
- Click on the Calendar tab in the Navigation Pane.
- Select the calendar that you wish to share from the Navigation Pane by clicking on the checkbox next to it.
- Click on Share.
- This should open up a Sharing invitation window, as shown below.
- Enter the person that you wish to share your calendar with into the To field, then change any of the other options as desired.
- Click Send.
- Click on the Calendar tab in the Navigation Pane.
-
Outlook Web Access (OWA)
-
-
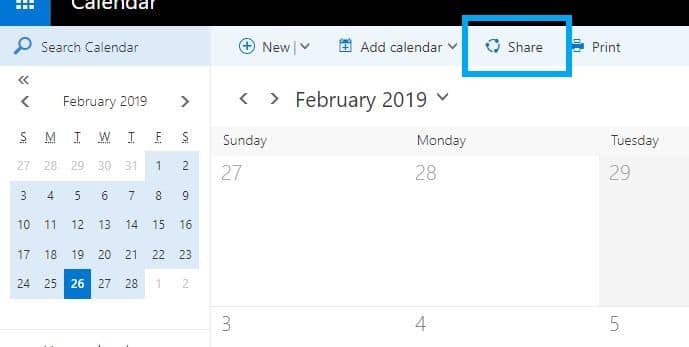
- Click on the Calendar tab in the Navigation Pane.
- Select the calendar that you wish to share from the Navigation Pane by clicking on the checkbox next to it.
- Under the Share menu at the top, select Share This Calendar…
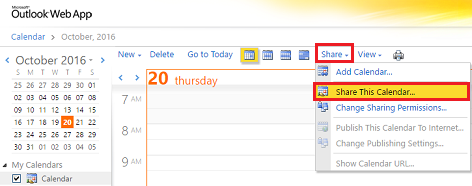
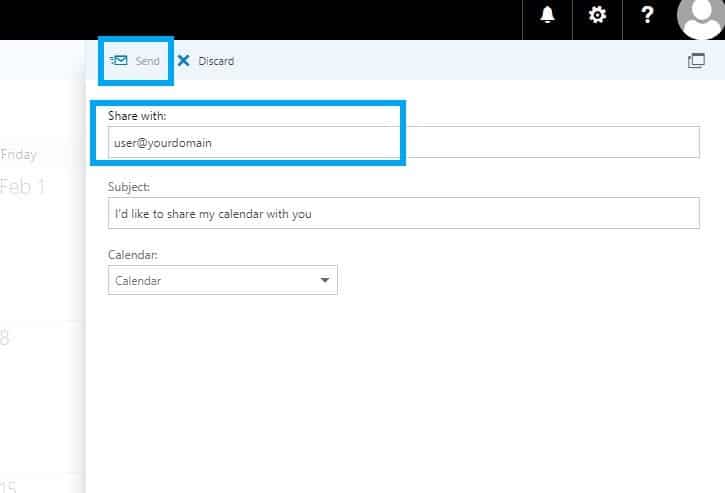
- This should open up a Sharing invitation window, as shown below.
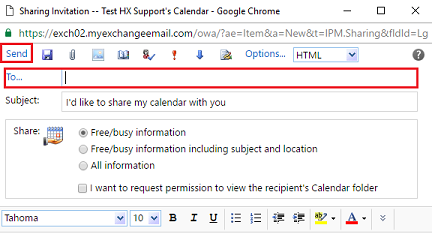
- Enter the name (or e-mail address) of the person that you wish to share your calendar with in the To field, then change any of the other options as desired.
- Click Send.
-